You can use WebCenter Spaces APIs to:
- Create and manage Spaces and Space templates. You can create and delete Spaces, and add custom attributes. For more information, see (WebCenter Developer's Guide) Section 50.2.5.1, "Managing Spaces and Space Template."Manage Space membership.
- You can add and remove Space members. For more information, see (WebCenter Developer's Guide) Section 50.2.5.2, "Managing Space Membership."
- Retrieve information about Spaces and Space templates. For example, you can retrieve the WebCenter Spaces URL or the URL of a specific Space. You can also retrieve Space and Space template metadata. For more information, see (WebCenter Developer's Guide) Section 50.2.5.3, "Retrieving Information for Spaces and Space Templates."
WebCenter Spaces APIs are contained within several classes. For more information on the different classes with descriptions on the purpose of the APIs within each class, see Table 50-1 in the WebCenter Developers Guide. In this post I will explain how to set up your portal application, and how to prepare your environment to support using the WebCenter Spaces APIs.
The first step describes the administrator tasks required to configure WS-Security for WebCenter Spaces so that the communication between the an application exposing WebCenter Spaces APIs (the client) and WebCenter Spaces (the producer) is secure, and that the identity of the user invoking the APIs is protected. In this section I will give examples of only the actual commands. If you would like more information on each of the command arguments are, please see Section 32 in the WebCenter Administration Guide.
Creating the WebCenter (Producer) Domain Keystore
To create and manage the keys and certificates in the JKS, use the keytool utility that is distributed with the Java JDK 6. Using keytool, generate a key pair:
keytool -genkeypair -keyalg RSA -dname "cn=spaces,dc=example,dc=com" -alias webcenter -keypass welcome1 -keystore webcenter.jks -storepass welcome1 -validity 1064
Export the Certificate containing the public key
keytool -exportcert -v -alias webcenter -keystore webcenter.jks -storepass welcome1 -rfc -file webcenter_public.cer
Importing the Certificate
keytool -importcert -alias webcenter_public -file webcenter_public.cer -keystore webcenter.jks -storepass welcome1
Note: If you are deploying your application to the same domain, you do not have to create the client keystore and keys. However, if the client is in a different domain, for example, testing your application in JDeveloper embedded WebLogic Server, you will need to do the next steps.
Creating the JDeveloper (Client) Domain Keystore
keytool -genkeypair -keyalg RSA -dname "cn=external_webcenter_custom,dc=example,dc=com" -alias external_webcenter_custom -keypass welcome1 -keystore external_webcenter_custom.jks -storepass welcome1 -validity 1024
Export the Certificate containing the public key
keytool -exportcert -v -alias external_webcenter_custom -keystore external_webcenter_custom.jks -storepass welcome1 -rfc -file external_webcenter_custom_public_key.cer
Import the Certificates
keytool -importcert -alias external_webcenter_custom_public_key -file external_webcenter_custom_public_key.cer -keystore webcenter.jks -storepass welcome1
This step is IMPORTANT as it contains the certificate from the WebCenter Domain
keytool -importcert -alias webcenter_public -file webcenter_public.cer -keystore external_webcenter_custom.jks -storepass welcome1
Once that is done you should have created 2 keystores, (producer) webcenter.jks (alias=webcenter) and (client) external_webcenter_custom.jks (alias=external_webcenter_custom). Pay close attention to the client alias name. This name is important as it will be used as a parameter in Spaces API code. The next steps are to register the keystores with both the WebCenter domain and JDeveloper (client) domain. This is a 2 step process. The first step is to modify the jps-config,xml and then use WLST to update the security credentials. Note before doing any of the proceeding modifications, be sure to BACK UP both the jps-config.xml and the cwallet.sso files.
Register Keystore in WebCenter (producer) Domain
Copy the keystore that you created for the WebCenter domain (webcenter.jks) to the fmwconfig directory. This directory is located in the [Oracle_Home]/user_projects/domains/[wc_domain]/config directory. In the same directory, open the jps-config.xml in a text editor. In this file, locate the "serviceInstance" node for the keystore.provider Provider: Update the "location" property for the new file name (i.e ./webcenter.jks).
serviceInstance name="keystore" provider="keystore.provider" location="./webcenter.jks"
Update Security Credentials in WSLT
Invoke WLST from [webcenter_home]/common/bin. Execute the following commands, note that the user= references the alias name (webcenter):
updateCred(map="oracle.wsm.security", key="keystore-csf-key", user="owsm", password="welcome1", desc="Keystore key")
updateCred(map="oracle.wsm.security", key="enc-csf-key", user="webcenter", password="welcome1", desc="Encryption key")
updateCred(map="oracle.wsm.security", key="sign-csf-key", user="webcenter", password="welcome1", desc="Signing key")
Register Keystore in JDeveloper (client) Domain
Copy the keystore that you created for the JDeveloper domain (external_webcenter_custom.jks) to the fmwconfig directory. This directory is located in the [JDeveloper_sys_home]/DefaultDomain/config directory. For example, on my systems this location is:
C:\Users\[your-user]\AppData\Roaming\JDeveloper\system11.1.1.4.37.59.23\DefaultDomain\config\fmwconfig
In the same directory, open the jps-config.xml in a text editor. In this file, locate the "serviceInstance" node for the keystore.provider Provider: Update the "location" property for the new file name (i.e ./external_webcenter_custom.jks).
serviceInstance name="keystore" provider="keystore.provider" location="./external_webcenter_custom.jks"
Update Security Credentials in WSLT
Invoke WLST from [JDeveloper_Home]/oracle_common/common/bin. Execute the following commands, note that the user= references the alias name (external_webcenter_custom):
updateCred(map="oracle.wsm.security", key="keystore-csf-key", user="owsm", password="welcome1", desc="Keystore key")
updateCred(map="oracle.wsm.security", key="enc-csf-key", user="external_webcenter_custom", password="welcome1", desc="Encryption key")
updateCred(map="oracle.wsm.security", key="sign-csf-key", user="external_webcenter_custom", password="welcome1", desc="Signing key")
Commands for checking the keystores and credentials
Once you have completed the above steps there are commands that can enable you to check to see if everything is setup correctly (i.e. the alias names match to the correct domain). For checking the credentials, run the following from WLST:
listCred(map="oracle.wsm.security", key="keystore-csf-key")
listCred(map="oracle.wsm.security", key="enc-csf-key")
listCred(map="oracle.wsm.security", key="sign-csf-key")
* Executing these commands against the WebCenter domain will give the following response:
[Name : owsm, Description : Keystore key, expiry Date : null]
PASSWORD:welcome1
[Name : webcenter, Description : Encryption key, expiry Date : null]PASSWORD:welcome1
[Name : webcenter, Description : Encryption key, expiry Date : null]PASSWORD:welcome1
* Executing these commands against the JDeveloper domain will give the following response:
[Name : owsm, Description : Keystore key, expiry Date : null]
PASSWORD:welcome1
[Name : external_webcenter_custom, Description : Encryption key, expiry Date : null]PASSWORD:welcome1
[Name : external_webcenter_custom, Description : Encryption key, expiry Date : null]PASSWORD:welcome1
For checking the keystores
keytool -list -v -keystore [keystore-name] -storepass [keystore-password]
Example of using the WebCenter Spaces API in JDeveloper
The following code snippet invokes a response from Spaces to return a list of group space names. Note the reference to the key alias from the keystore:
GroupSpaceWSContext context = new GroupSpaceWSContext(); context.setEndPoint("http://[host]:[port]/webcenter/SpacesWebService");
context.setSamlIssuerName(http://www.oracle.com/);
context.setRecipientKeyAlias("external_webcenter_custom");
try {
GroupSpaceWSClient groupSpaceWSClient = new GroupSpaceWSClient(context);
List
for(String name : gspaceList){
System.out.println(name);
}
} catch (Exception e) {...}
One final important note. In order for the client code to work, you must also have a security token to provide the user. This can be accomplished by enabling ADF security on the application, which is invoking the Spaces API code.
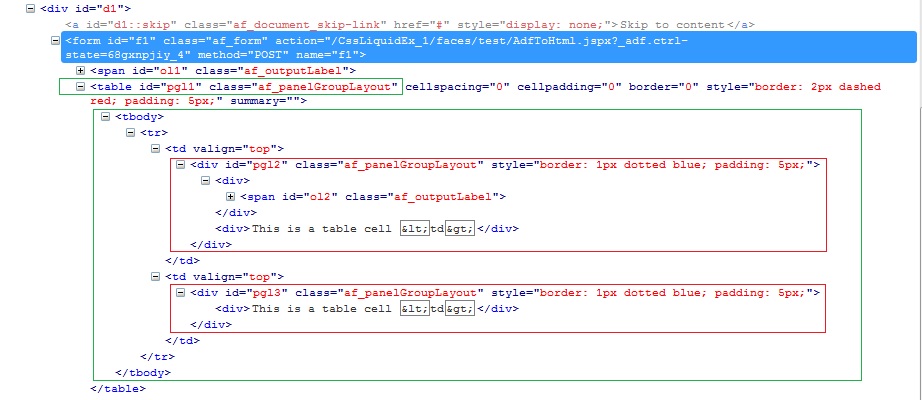
 This, in turn produces these HTML tags: