Tuesday, August 9, 2011

We be posting new blogs on Oracle ATEAM Blog site

For now, I will be blogging new WebCenter related posts on the new Oracle ATEAM Blog site.  The site location is here:

http://fusione2o.blogspot.com/

Friday, July 22, 2011

WebCenter Navigation model revisted: creating UI menus and the hidden gem...

Typically, portals provide information from various different sources. Information may be provided by pages, portlets, task flows, content repositories, and external pages. Users need a way to easily move through this information and quickly access the specific information that they need. You provide this access to information through your portal navigation. The navigation model defines the content, structure, and metadata of the navigation. When you create the navigation model, you specify the items to include and the hierarchy of those items. Navigation models can include the following resources, for example, pages, external resource, page queries, and other navigation models.
Using the navigation model, you can then create a UI menu, using a combination of standard HTML tags, JSTL, and Epresssion Language (EL) to interate through the model collection. The rendering, or look-n-feel of the menu is implemented by the CSS (skin).

In this blog I will not be covering the creation of the navigation model, since there are numerous blogs covering this topic. Rather I will focus more on how to render the menu in the UI, and also point out a hidden property on the naigation model that will enable you to write less code when iterating through the navigation model's collection.

Let's look at a example of a navigation model, which was created in Spaces. (Note: The following information are also relevent in a 'custom' WebCenter Portal Application).

Basically, there are 3 main (top) links (i.e. Parents), and 2 'children' under the Parent 1 link. One of the children in this model is a regular (link) to a Page, and the other child is a Page Query (which can return a collection of Pages. Using the Preview option in the Edit navigation model, the model will display the desire behavior in the UI.
As you can see, the Page Query also returns it's own collection of pages. Now that we have the navaigation model in place, we now need to create the UI code that will iterate through the naigation model's collection. As I mentioned before, I will use in this example standard code. The following is the code that I will use to visualize my navigation model:

When I add the code to my Space Page Template, and refresh the View, the following get displayed:

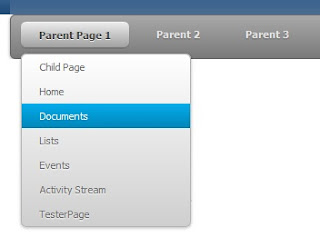
So far so good. I can see the hierarchy of the links have stamped out correctly. In addition, the code that is iterating through the model collection is pretty straight foward. You will also notice that there are also CSS style classes set on many of the code elements to enable the to look like a standard menu (with it's children as menu items). When I add the CSS to my Spaces Page Template as a standard adf resource, and rerun the page, you can see the look like a standard menu:

OK, now that is what I am expecting, a nice menu, which supports a hierarchtical navigation model. Now, I would like to take the navigation model one step further (later exposing the hidden gem), by adding a navigation model reference into my main navigation model. Basically, a navigation model reference enables the model to add it's model collection to the main models collection. For this example, I will create a simple navigatio model, which has only 3 parent pages. (Note: you are not contrained to this, since this this is a full navigation model):

Back in the (main) navigation model, I will add this navigation model (under Parent 3) in the main as a navigation model reference:

Previewing the main navigation model, I can see that I am able to view the reference navigation model's child links:
Now when I rerun the template, I should be able to see the navigation model child links, just like the Page Query:
Great! Now lets change this up a bit. Since my code is set to iterate through the multi-levels, I would like to add the navigation model reference as a child to another child (i.e. grandchild).


Re-running the template:

Great, the UI code can still handle the multi-levels! So what is the hidden gem? When you create a navigation reference in Spaces (unlike-custom WC Portal app), there is an attribute property that gets set for you automatically. For example, the following is the navigation model code snippet from my demo:

includeNavigation id="newincl5" insertFolderContents="true"

It is the insertFolderContents attribute, which enables the collection to 'bubble up' past the initially nav model reference. What I mean is that the navigation model reference inside of another navigation model, is actually a 'folder', that then holds it's children. So setting the insertFolderContents= false, (or in the case of doing these operations in the JDeveloper custom Portal application), not having this attribute set at all, will not let the navigation model reference expose it's children in the current UI code. You can, however, write additional code to 'check' to see if the current node is a 'folder'. But, that would me writing more code for every level of the hierarchy. I would rather ensure that this attribute is set to 'true'.

Wednesday, June 22, 2011

Disabling Content Compression in WebCenter Spaces

By default, and for performance/optimization, WebCenter Spaces runs in the browser with the page markup generation compression set to be ON.


However, there are cases when you are developing a customized skin (CSS) for Spaces, that you need to "see" the actual component's style class selector name (af_panelGroupLayout), not the compressed version (i.e. xyz). To disable the compression is an easy step. Bascially, you will need to add a context-param to Spaces web.xml:


What's not so intuative is how this is achieved in Spaces. The best way to do this is through the extension workspace, DesignWebCenterSpaces.jws. You can get more information on "extending" Space, and also the download link to the workspace here. Once you have downloaded (and configured) the DesignWebCenterSpaces workspace, you can then follow the next steps.

Double-click the WebCenterSpacesExtensionLibrary project inside the workspace. This will open the Project Properties dialog. In the left pane, select the Project Source Paths. In the "Included" tab section, click on the "Add..." button. From within the "Add Include Filters"dialog, navigate to and select the web.xml file from within the WebCenterSpacesExtensionLibrary/public_html/WEB-INF directory.


Click OK to dismiss the dialog. This will add the web.xml to the project.


Next, in the left pane, click on "Deployment". In the right pane, select the custom_webcenter_spaces_war (WAR File) deployment profile, and click the "Edit..." button. This will open the Edit WAR Deployment Profile Properties dialog. In the left pane, open the "File Groups", "Web Files" section, and select "Filters". In the right pane, check the web.xml file.


Click OK, to save and dismiss the dialog. Next click OK to save and dismiss the Project Properties dialog. In the Application Navigator, expand the WebCenterSpacesExtensionLibrary\public_html\WEB-INF folder. Notice that the web.xml has been added. Double-click on this file to open it in the file editor. Remove the , and tags, as these tags are not needed. Next add the tags that will enable the disabling of the content compression:


Save the file. The next step is to regenerate the WAR file for deployment. (Note: by default (OOTB), there is already a version of this war, which has been deployed to the Spaces server. The deployment process will created a "versioned" war. More on this later ...) Locate the build.xml file, which is located within the WebCenterExtensionLibrary project. Right-click on the build.xml, and from the context menu, select "clean stage" from the Run ANT target menu options.


This will create the new "extend.spaces.webapp.war" file, which will update the already deployed version in Spaces. Before deployment, you can check to see if the web.xml has been added to the war by looking into the "exploded" directory. For example:


You will see a tag has been added along with the content compression based tag, but this is OK. Once you have confirmed that the web.xml has been added. You are ready to deploy the new war to the WebLogic managed instance. Locate the build.xml file again. Next right-click on the file, and from the context menu, select "deploy-shared-lib" from the Run ANT target menu options.


The ANT task will run and deploy the new version of this war. After a successfull execution, you can view the new deployment in the WebLogic console. The newest version, signified by the highest version number, will be the library that gets used by WebLogic.


After the deployment has been verified, you will need to RESTART the Spaces managed instance. Once this is done, open up Spaces and for example, in Firebug you will notice that the style classes are displaying the real names.


As you can see, this option can really help speed up the development of a CSS, and ensure that you are using the right style class.

Wednesday, June 1, 2011

Remote Debugging custom task flows in WebCenter Spaces

For those who do not know, Oracle WebCenter Spaces is a ready-to-use application that delivers dynamic business communities and pulls together the capabilities of all the WebCenter Services. Oracle WebCenter Services provides a comprehensive set of standards-based components that enrich existing portals and Web sites with the industry's most complete and open set of Enterprise 2.0 capabilities. These Social Computing Services include wikis, blogs, online awareness and communications, content collaboration and social networks. Oracle WebCenter Services works with all Oracle portal offerings, enabling organizations to enhance their existing enterprise portals and Web sites, and empowering users with Enterprise 2.0 services that work with their existing information systems.

WebCenter Spaces can be customized using browser-based tools and also using JDeveloper. For example, you may want to deploy additional shared libraries that include custom code or some additional task flows. Or, you might want to edit/create WebCenter Spaces resources, such as skins, page templates, and navigations, in JDeveloper. When developing the custom task flows in JDeveloper, there are many times that you will need to test/debug the code after the code has been deployed to a running instance of Spaces. In this post I will describe how to accomplish this process.

Configuring the Spaces Managed Server Instance

The first step towards enabling debugging is to be able to start the WebLogic managed server, which is hosted Spaces, in debug mode. One way of setting this up is to modify the startManagedWebLogic.sh (linux) that will start Spaces. This script is located in the /user_projects/domains//bin directory. However, since this script is used to start all of the WebCenter hosted services (UCM, Collaboration, .etc), this would mean that these instances would be started in debug mode as well. Yes, this would be OK, but unneccesary for what I want to do. So what I do is to make a copy of this script (name the file something like startDebugManagedWebLogic.sh) and then modify this version of the script.

In the new startDebugManagedWebLogic.sh file locate the section that declares the JAVA_OPTIONS.

Modify the startDebugManagedWeblogic.sh file and add the debug java options: -Xdebug -Xnoagent -Xrunjdwp:transport=dt_socket,address=4000,server=y,suspend=n to the JAVA_OPTIONS. For example, in my file I added this option in front of the existing option already there:

JAVA_OPTIONS="-Xdebug -Xnoagent -Xrunjdwp:transport=dt_socket,address=4000,server=y,suspend=n -Dweblogic.security.SSL.trustedCAKeyStore="/home/oracle/Middleware/wlserver_10.3/server/lib/cacerts" ${JAVA_OPTIONS}"
export JAVA_OPTIONS

Once this is done you will be able to use this script to start Spaces in debug mode. To check to see if the option has been enabled you will see the reference to the debug mode: Listening for transport dt_socket at address: 4000 in the Spaces terminal window.

Configuring JDeveloper

The next step is to enable the remote debugging feature for your project in JDeveloper. To do this, go to your project's properties. Select the Run/Debug/Profile section, and click the Edit button for the "default" setting. This will bring up a dialog where you can check the Remote Debugging option.

After this step you can then proceed to set breakpoints in your source, and then "Attach" to the running debug WLS instance. To attach, simply right click on the project (in the JDeveloper application navigator) and from the context menu, select "Start Remote Debugging".

Here's a screen shot of a JDeveloper debug session, debugging the WebCenter Page Service native API code, which I had blogged about in a previous post.

As you can see, being able to debug you Spaces based code in a running Spaces instance can be invaluable for tracking down those nasty bugs, and is very easy to set up.

New Blog Site by my fellow ATEAMers

My fellow ATEAM colleagues and I have started a new blog site, Oracle Fusion Middleware E20, which cover topics related to OFM, ADF, and WebCenter. The URL is http://fusione2o.blogspot.com/.

Friday, May 20, 2011

Example Using the WebCenter Native Page Service API

Recently I received a request to create a task flow, which would be able to programmatically set security permissions to a (Spaces) group space page.  Of course WebCenter Spaces OOTB already has a supporting UI (from the Manage Page Link) for this task.  However, whatever the requirement is for enabling this functionality, it is good to know that there is a public API to code against.  You can view the documentation here

In this example, since I need to interact with the Page Service, I need to create an instance of the Service:

      Scope mScope = ServiceContext.getContext().getScope();
      String scopeToUse = "defaultScope";
      if (mScope != null){
        scopeToUse = mScope.getName();
      }
      PageService mPageService =
          PageServiceFactory.createInstance(new PageServiceConfig((MDSSession)ADFContext.getCurrent().getMDSSessionAsObject(),
                                                                  scopeToUse));


In this code fragment mScope contains the MDS based information of the particular group space.  For example, in this example:

 Scope[name=MyGroupSpace, guid=s6dbba758_c69f_4602_af4d_0834b84b3dde]

There are also 2 methods that will enable the extraction of useful information about the scope itself. One is the getName(), which return the group space name, and the other getGUID(), which returns the unique id of the group space location in MDS.  These methods are great for deriving code, which can be use to pass as parameters of certain methods. Later on I will give an example of this to find the "path" of the page I want to add security on.  Once I have established the page service, I can now create code to complete my use case:

      mPageService.invalidateUserCache(getUserName());
      String grantee = "martin";
      String permisssions = "edit, view";
      String initPath = "/oracle/webcenter/page/scopedMD/";
      String testPath = initPath + mScope.getGUID() + Page2.jspx;
      PageDef pageDef = mPageService.getPage(testPath);
      // This get page in MDS at location:
      // oracle/webcenter/page/scopedMD/s6dbba758_c69f_4602_af4d_0834b84b3dde/Page2.jspx
      mPageService.changePagePermission(CustomPagePermission.class.getCanonicalName(),
                                        pageDef.getContentMRef(), true);
      mPageService.grantPagePermission(pageDef.getContentMRef(), grantee, 
      permissions);
      mPageService.saveChanges();
      mPageService.invalidateScopeCache();


There are 2 steps actually in getting this to work correctly.  The first step is that the page permission must be set to use "CustomPagePermission" page security.  The default is "PagePermission".  This is achieved by using the changePagePermisssion().  The next step is to set the new grants by using the grantPagePermission().  This method takes as its parameters, the page "path" (notice how I use the scope methods to help me create the page path), and grantee name (either a user or group, which has been defined in ldap provider, for example) , and the new permission(s), a String that has the values separated by commas.  Valid values are: manage, update, delete, personalize, view.

After invoking the code, I can query the PageSecurity Manager to check my policy updates:

page policy oracle.webcenter.page.model.security.PagePolicy@137fa30
Page : /oracle/webcenter/page/scopedMD/s6dbba758_c69f_4602_af4d_0834b84b3dde/Page2.jspx
 granted to martin

    with permission(s) [edit, view]


 Well there you have it.  A simple example showing how easy it is to use the WebCenter APIs!

Thursday, April 21, 2011

WebCenter domain configuration for WebCenter Spaces APIs

While using your WebCenter Portal application, users may encounter situations where a Space would be useful to help them complete a particular task. In such cases, it would be much less disruptive to remain within the context of the current application, rather than having to switch to the WebCenter Spaces application. To this end, WebCenter Spaces provides access to a subset of its Space functionality through several APIs. Using these APIs, you can integrate powerful Space functionality into your WebCenter Portal application.
You can use WebCenter Spaces APIs to:
  • Create and manage Spaces and Space templates. You can create and delete Spaces, and add custom attributes. For more information, see (WebCenter Developer's Guide) Section 50.2.5.1, "Managing Spaces and Space Template."Manage Space membership.
  • You can add and remove Space members. For more information, see (WebCenter Developer's Guide) Section 50.2.5.2, "Managing Space Membership."
  • Retrieve information about Spaces and Space templates. For example, you can retrieve the WebCenter Spaces URL or the URL of a specific Space. You can also retrieve Space and Space template metadata. For more information, see (WebCenter Developer's Guide) Section 50.2.5.3, "Retrieving Information for Spaces and Space Templates."

WebCenter Spaces APIs are contained within several classes. For more information on the different classes with descriptions on the purpose of the APIs within each class, see Table 50-1 in the WebCenter Developers Guide.  In this post I will explain how to set up your portal application, and how to prepare your environment to support using the WebCenter Spaces APIs.

The first step describes the administrator tasks required to configure WS-Security for WebCenter Spaces so that the communication between the an application exposing WebCenter Spaces APIs (the client) and WebCenter Spaces (the producer) is secure, and that the identity of the user invoking the APIs is protected. In this section I will give examples of only the actual commands. If you would like more information on each of the command arguments are, please see Section 32 in the WebCenter Administration Guide.

Creating the WebCenter (Producer) Domain Keystore

To create and manage the keys and certificates in the JKS, use the keytool utility that is distributed with the Java JDK 6. Using keytool, generate a key pair:

keytool -genkeypair -keyalg RSA -dname "cn=spaces,dc=example,dc=com" -alias webcenter -keypass welcome1 -keystore webcenter.jks -storepass welcome1 -validity 1064

Export the Certificate containing the public key

keytool -exportcert -v -alias webcenter -keystore webcenter.jks -storepass welcome1 -rfc -file webcenter_public.cer

Importing the Certificate

keytool -importcert -alias webcenter_public -file webcenter_public.cer -keystore webcenter.jks -storepass welcome1

Note: If you are deploying your application to the same domain, you do not have to create the client keystore and keys. However, if the client is in a different domain, for example, testing your application in JDeveloper embedded WebLogic Server, you will need to do the next steps.

Creating the JDeveloper (Client) Domain Keystore

keytool -genkeypair -keyalg RSA -dname "cn=external_webcenter_custom,dc=example,dc=com" -alias external_webcenter_custom -keypass welcome1 -keystore external_webcenter_custom.jks -storepass welcome1 -validity 1024

Export the Certificate containing the public key

keytool -exportcert -v -alias external_webcenter_custom -keystore external_webcenter_custom.jks -storepass welcome1 -rfc -file external_webcenter_custom_public_key.cer

Import the Certificates

keytool -importcert -alias external_webcenter_custom_public_key -file external_webcenter_custom_public_key.cer -keystore webcenter.jks -storepass welcome1

This step is IMPORTANT as it contains the certificate from the WebCenter Domain

keytool -importcert -alias webcenter_public -file webcenter_public.cer -keystore external_webcenter_custom.jks -storepass welcome1

Once that is done you should have created 2 keystores, (producer) webcenter.jks (alias=webcenter) and (client) external_webcenter_custom.jks (alias=external_webcenter_custom). Pay close attention to the client alias name. This name is important as it will be used as a parameter in Spaces API code.  The next steps are to register the keystores with both the WebCenter domain and JDeveloper (client) domain. This is a 2 step process. The first step is to modify the jps-config,xml and then use WLST to update the security credentials. Note before doing any of the proceeding modifications, be sure to BACK UP both the jps-config.xml and the cwallet.sso files.

Register Keystore in WebCenter (producer) Domain

Copy the keystore that you created for the WebCenter domain (webcenter.jks) to the fmwconfig directory. This directory is located in the [Oracle_Home]/user_projects/domains/[wc_domain]/config directory. In the same directory, open the jps-config.xml in a text editor. In this file, locate the "serviceInstance" node for the keystore.provider Provider: Update the "location" property for the new file name (i.e ./webcenter.jks).

serviceInstance name="keystore" provider="keystore.provider" location="./webcenter.jks" 

Update Security Credentials in WSLT

Invoke WLST from [webcenter_home]/common/bin. Execute the following commands, note that the user= references the alias name (webcenter):

updateCred(map="oracle.wsm.security", key="keystore-csf-key", user="owsm", password="welcome1", desc="Keystore key")


updateCred(map="oracle.wsm.security", key="enc-csf-key", user="webcenter", password="welcome1", desc="Encryption key")


updateCred(map="oracle.wsm.security", key="sign-csf-key", user="webcenter", password="welcome1", desc="Signing key")

Register Keystore in JDeveloper (client) Domain

Copy the keystore that you created for the JDeveloper domain (external_webcenter_custom.jks) to the fmwconfig directory. This directory is located in the [JDeveloper_sys_home]/DefaultDomain/config directory. For example, on my systems this location is:

C:\Users\[your-user]\AppData\Roaming\JDeveloper\system11.1.1.4.37.59.23\DefaultDomain\config\fmwconfig

In the same directory, open the jps-config.xml in a text editor. In this file, locate the "serviceInstance" node for the keystore.provider Provider: Update the "location" property for the new file name (i.e ./external_webcenter_custom.jks).

serviceInstance name="keystore" provider="keystore.provider" location="./external_webcenter_custom.jks"

Update Security Credentials in WSLT

Invoke WLST from [JDeveloper_Home]/oracle_common/common/bin. Execute the following commands, note that the user= references the alias name (external_webcenter_custom):

updateCred(map="oracle.wsm.security", key="keystore-csf-key", user="owsm", password="welcome1", desc="Keystore key")

updateCred(map="oracle.wsm.security", key="enc-csf-key", user="external_webcenter_custom", password="welcome1", desc="Encryption key")

updateCred(map="oracle.wsm.security", key="sign-csf-key", user="external_webcenter_custom", password="welcome1", desc="Signing key")

Commands for checking the keystores and credentials

Once you have completed the above steps there are commands that can enable you to check to see if everything is setup correctly (i.e. the alias names match to the correct domain).   For checking the credentials, run the following from WLST:

listCred(map="oracle.wsm.security", key="keystore-csf-key")
listCred(map="oracle.wsm.security", key="enc-csf-key")
listCred(map="oracle.wsm.security", key="sign-csf-key")

* Executing these commands against the WebCenter domain will give the following response:

[Name : owsm, Description : Keystore key, expiry Date : null]
PASSWORD:welcome1

[Name : webcenter, Description : Encryption key, expiry Date : null]PASSWORD:welcome1

[Name : webcenter, Description : Encryption key, expiry Date : null]PASSWORD:welcome1

* Executing these commands against the JDeveloper domain will give the following response:

[Name : owsm, Description : Keystore key, expiry Date : null]
PASSWORD:welcome1

[Name : external_webcenter_custom, Description : Encryption key, expiry Date : null]PASSWORD:welcome1

[Name : external_webcenter_custom, Description : Encryption key, expiry Date : null]PASSWORD:welcome1

For checking the keystores

keytool -list -v -keystore [keystore-name] -storepass [keystore-password]

Example of using the WebCenter Spaces API in JDeveloper

The following code snippet invokes a response from Spaces to return a list of group space names. Note the reference to the key alias from the keystore:

GroupSpaceWSContext context = new GroupSpaceWSContext(); context.setEndPoint("http://[host]:[port]/webcenter/SpacesWebService");

context.setSamlIssuerName(http://www.oracle.com/);
context.setRecipientKeyAlias("external_webcenter_custom");
try {

GroupSpaceWSClient groupSpaceWSClient = new GroupSpaceWSClient(context);
List gspaceList = groupSpaceWSClient.getGroupSpaces(null);
for(String name : gspaceList){
System.out.println(name);
}
} catch (Exception e) {...}

One final important note.  In order for the client code to work, you must also have a security token to provide the user.  This can be accomplished by enabling ADF security on the application, which is invoking the Spaces API code.

Friday, April 8, 2011

ADF Layouts Revisted

Designing UI pages in ADF can be somewhat cumbersome if you don't understand what really goes on behind the scenes when using the layout specific tags such as panelGroupLayout. OOTB JDeveloper comes with many different types of layout based tags. If you have read my previous post on layout management, you will notice that some of these tags are meant for specific layout design type patterns: Stretch (application LaF i.e. JDeveloper UI), or Flow (generic web site LaF). Moreover, using the layout tags in an "illegal" combination usually creates a design that renders the UI in a undesirable behavior. For example, stretchable items (i.e. tables) not stretching, or scrollable (flow) content not scrolling. To better understand how to create better layouts we must first understand what the layout components will actually turn into HTML wise on the browsers end. This knowledge will help not only in choosing the correct combination of layout tags, but will also enable you to use the power of CSS styles to "control" how the elements look and behave. The first layout tag that I am going to discuss is one of the most used tag, the panelGroupLayout.

* Tag name: af:panelGroupLayout

* UIComponent class:oracle.adf.view.rich.component.rich.layout.RichPanelGroupLayout

* Component type: oracle.adf.RichPanelGroupLayout

The panelGroupLayout control is a layout element that arranges its children in one of a few simple patterns. Each pair of adjacent children will be separated by an optional separator child. It can lay out children consecutively (wrapping as needed), or in a single horizontal line, or vertically.

Rules of thumb on usage:

* Never place a scrolling panelGroupLayout inside of another scrolling panelGroupLayout since users do not like nested scroll bars

* Never specify percentage heights in any component's inlineStyle attribute

Never use the "position" style in any component's inlineStyle attribute. Unless you are using fixed pixel heights on them, you would never place a panelSplitter or panelStretchLayout inside of any panelGroupLayout regardless of what you have set its layout attribute to.

If you believe that you need to break one of these rules, this is an indication that your page structure is not following the page structure guidelines and you will likely have troubles getting your application to render consistently across various web browsers and computing platforms. You may also alternatively place a facetRef, iterator, or switcher inside of the panelGroupLayout and their resolved children will be treated as if they were direct children of the panelGroupLayout. If you don't want this behavior, you may wrap the children you want to be grouped in a group component.

Geometry Management:

* This component CAN be stretched by a parent layout component that stretches its children, e.g., panelStretchLayout if: layout="scroll" or layout="vertical"

* This component CANNOT be stretched by a parent layout component that stretches its children if: layout="default" or layout="horizontal"

Ok, now that we understand what the adf side of things are. When you use the panelGroupLayout what happens on the browser side? Based on the layout "type" selected, this will mean different things. In general, here are the browser HTML equivalents to the different layout styles:

* layout= "default" will turn into a HTML “SPAN”

* layout = "vertical" will turn into a HTML “DIV”

* layout= “scroll” will also turn into a HTML “DIV” - with an added "style" setting to induce the vertical scrollbar to appear - overflow: auto; width: 100%; height: 100%;

* layout=”horizontal” will turn into a HTML “table”- with 1 HTML row “TD” defined. Each element added will become a HTML cell “TD”

To give an example of using the panelGroupLayout in combinations of other panelGroupLayouts that uses different layout settings, here is an image that shows a simple use case. Note: the colored borders are there to show each of the component elements.


The ADF components that were used are as follows:

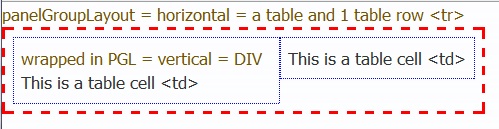
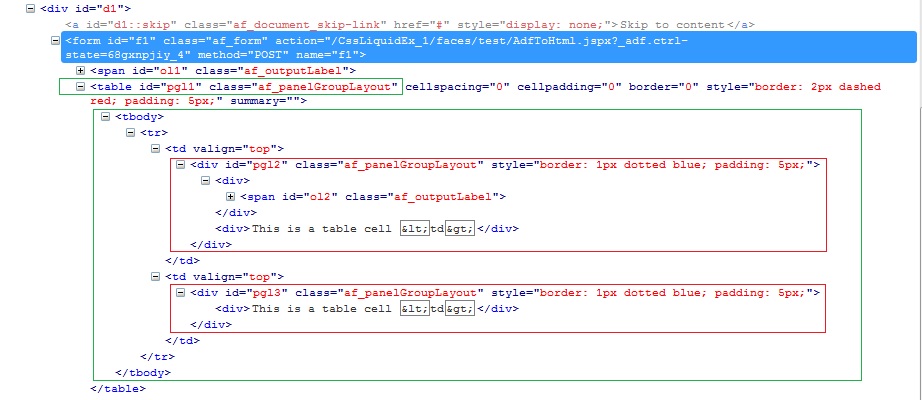
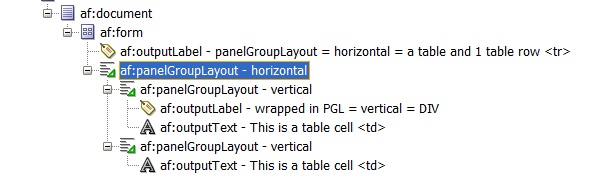
This, in turn produces these HTML tags:


In this example, the top panelGroupLayout (bordered in green) has been set to layout=horizontal, which sets the tag in the browser to be an HTML “TABLE”. In this table body, you see 1 table row (TR) defined. Each subsequent item added to the row, becomes a table cell (TD). The 2 items that have been added are panelGroupLayout’s that have the layout set to “vertical”, which in turn creates a HTML “DIV”. Knowing this you can add standard CSS style elements to these ADF layout tags to create visual behavior such as padding and margin. This is just a example on how to use the appropriate ADF layout tags to create conventional visual designs. In addition, once you have mastered what the ADF to HTML tag equivalents are, you will be able to convert your HTML mockups into the ADF world. In my next post I will cover more of the layout tags.

Wednesday, March 9, 2011

Dynamic resizing for popup dialogs

In some specific circumstances you may need to fulfill a requirement that would have a popup dialog (containing for example, an adf table), resize itself dynamically based on the browser viewing size. This behavior is similar to how the panelCollection component handles the popup window that is invoked from the "detach" menu item. By default, the panelWindow, which is the immediate child of the popup, height (ContentHeight) and width (ContentWidth)property values are not set. This enables the popup to launch with the default size settings for the panelWindow:


Of course you can always set the values on these 2 properties to alter the size on the panelWindow itself. Unfortunately, the trick will be to calculate the browser view dimensions in java, which in turn can be then passed/set on each of the content (width and height) property values. Now this issue can be solved by getting the browser view dimensions through javascript (there are plenty examples on the web for doing so), but then the next challenge would be to figure out a clever way on how to pass these (javascript based) values to the panelWindow component properties.

Fortunately, there is a much better way to get these dimensions through the ADF JavaScript API. In addition, I can also use javascript to pass the retreived dimension values to the panelWindow itself. The following javascript code fragment will do the trick:

function openPopup(popupId, panelWindowId)
{
return function(event)
{
var agent = AdfAgent.AGENT;
var windowWidth = agent.getWindowWidth();
var windowHeight = agent.getWindowHeight();
var popup = AdfPage.PAGE.findComponentByAbsoluteId(popupId);
var panelWindow = popup.findComponent(panelWindowId);
panelWindow.setContentWidth(Math.max(100, windowWidth-60));
panelWindow.setContentHeight(Math.max(100, windowHeight-80));


if(popup != null)
popup.show();
else
popup.hide();
}
}

Also note that this function also takes care of displaying the popup. Normally, you would invoke the popup through the af:showPopupBehavior (operations based tag). This tag is simply replaced by the af:clientListener tag. For example:

af:clientListener type="action" method="openPopup('popupId','panelWindowId')"

Using this methodology the working results are as such:


So there you have it, a nice resizable popup without having to write alot of code. Thanks to my good friend and colleague Frank Nimphius on setting me on the right path in discovering this solution.

I have provided the code sample zip here